Feb 062013
 

After some experimentation with the RaspAP, I decided to write up a simple web interface for it so that when hostapd started broadcasting, I could use a simple web page rather than ssh to control the wifi and hostapd on the Raspberry Pi. The distribution I used was Raspbian Server Edition once again.

I started off by installing lighttpd and php5

apt-get install lighttpd php5-cgi

After that, I enabled php for lighttpd and restarted it for the settings to take effect.

sudo lighty-enable-mod fastcgi-php
/etc/init.d/lighttpd restart

Now, comes the fun part.
For security reasons, the www-data user which lighttpd runs under is not allowed to start or stop daemons, or run commands like ifdown and ifup, all of which I wanted my page to do.
So what I have done, is added the www-data user to the sudoers file, but with restrictions on what commands the user can run.
The line appears in /etc/sudoers like this –

www-data ALL=(ALL) NOPASSWD:/sbin/ifdown wlan0,/sbin/ifup wlan0,/bin/cat /etc/wpa_supplicant/wpa_supplicant.conf,/bin/cp /tmp/wifidata /etc/wpa_supplicant/wpa_supplicant.conf,/sbin/wpa_cli scan_results,/sbin/wpa_cli scan,/bin/cp /tmp/hostapddata /etc/hostapd/hostapd.conf,/etc/init.d/hostapd start,/etc/init.d/hostapd stop,/etc/init.d/dnsmasq start,/etc/init.d/dnsmasq stop,/bin/cp /tmp/dhcpddata /etc/dnsmasq.conf

Notice I’ve restricted the www-data user to only be able to run the exact commands in the sudoers file
This means that the www-data can only take down, bring up, and show the configuration of wlan0 for example.

After the sudoers file has been modified, the script can now do what it needs to do.
I have a very very rough version written up so far, but it’s not available to download yet.

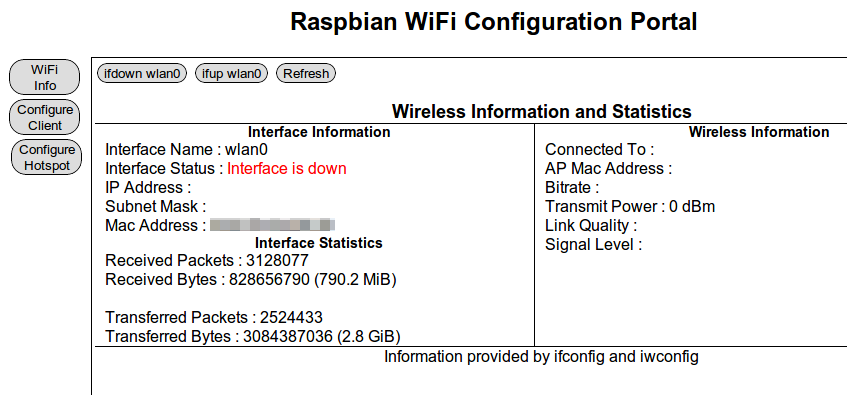
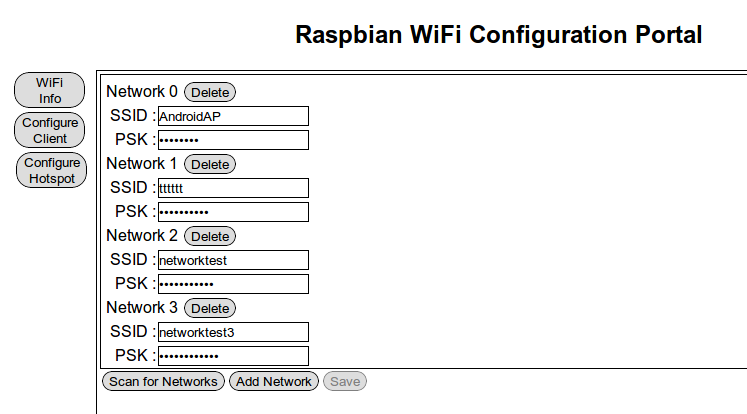
Here are some screenshots of what it’ll be able to do though ! 🙂

WiFi Information screen
infowifi

WiFI Client connection screen
configwifi

WiFi Hotspot setup screen
confighostapd

I’m in the process of prettying up the GUI but in the meantime, this is functional enough 🙂
I’ll get the demo up and running soon enough too ! 🙂

**Update**
I have released the PHP files for this – Please check this post for details.

Share
Jan 272013
 

I recently got my Raspberry Pi to act as a WiFi Router with shaping by using hostapd, tc, and iptables together to broadcast as an Access Point, apply shaping rules, and apply packet marking respectively.

This can be done on any device with 2 NICs but this may come in useful for anyone using the Pi as a router but doesn’t want people using all the bandwidth.

I will be going through the iptables and tc configuration in this post, but I won’t go through the hostapd setup as that was the same as part 3 of my Raspi WiFi Access point guide.

I started off with a blank slate of Raspbian Server Edition again, and I didn’t need to install any utilities as iptables and tc are installed by default.
**Note** All command are run as root. If you are not running as root, prepend sudo to all commands

Setting up tc

tc is the program that is in charge of setting up the shaping rules.

Step 1
Firstly, we will setup the default rule for the interface, which is wlan0 in this instance.

These 2 commands sets the default policy on wlan0 to shape everyone’s download speed to 64 kilobytes a second.

tc qdisc add dev wlan0 root handle 1:0 htb default 10
tc class add dev wlan0 parent 1:0 classid 1:10 htb rate 64kbps ceil 64kbps prio 0

Step 2
Next, we’ll setup another class to shape certain addresses to a higher speed.
We also need to setup a filter so that any packets marked as such go through this rule

tc class add dev wlan0 parent 1:1 classid 1:5 htb rate 256kbps ceil 256kbps prio 1
tc filter add dev wlan0 parent 1:0 prio 1 handle 5 fw flowid 1:5

Once that class is setup, we’ll need to setup iptables to mark the specific packets we want to shape as such.

Setting up iptables

Step 1
Firstly, we’ll create the mangle table that we need. I’ve used a custom chain in the mangle table in this snippet
The below code creates the new chains of shaper-in and shaper-out, and then sets up some rules for any packets coming in and out of wlan0 and eth0 to go through the new chains.

iptables -t mangle -N shaper-out
iptables -t mangle -N shaper-in

iptables -t mangle -I POSTROUTING -o wlan0 -j shaper-in
iptables -t mangle -I PREROUTING -i wlan0 -j shaper-out
iptables -t mangle -I PREROUTING -i eth0 -j shaper-in
iptables -t mangle -I POSTROUTING -o eth0 -j shaper-out

Step 2
Once that is done, we can then setup the packet marking so that any packets from the 10.0.0.0/24 subnet gets marked with a 1, otherwise if the IP address is 10.0.0.5, they will get marked with a 5

iptables -t mangle -A shaper-out -s 10.0.0.0/24 -j MARK --set-mark 1
iptables -t mangle -A shaper-in -d 10.0.0.0/24 -j MARK --set-mark 1

iptables -t mangle -A shaper-out -s 10.0.0.5 -j MARK --set-mark 5
iptables -t mangle -A shaper-in -d 10.0.0.5 -j MARK --set-mark 5

With that done, any connections going through wlan0 should now be shaped to 64kbps unless you have the IP address of 10.0.0.5 in which case you will be shaped to 256kbps

If more shaping speeds or IP addresses are required, then step 2 in the respective sections will need to be modified / added onto to give you the extra options.
I used Speedtest Mini hosted on my own webserver to test the speeds while I was shaping the connections as it provided an easy to use interface, but wget on a big file can also be used to test the speeds.

Setting up router to auto-start

If you want the shaping to start automatically, put all the commands into 1 or 2 shell script files in /etc/network/if-up.d and they will be run automatically.
e.g. /etc/network/if-up.d/router and /etc/network/if-up.d/shaper
make sure they have both been chmodded to be executable by running this on both files

chmod +x /etc/network/if-up.d/router


Sources :
tc: Linux HTTP Outgoing Traffic Shaping (Port 80 Traffic Shaping)

Share