In my last post, I built a script to poll my modem via Telnet to retrieve ADSL stats.
In this post, I’ll be using the output of the last script to put the values into Zabbix so I have some history to refer to.
The Script
I’ve found with my modem that it can’t handle the constant polls if I poll the modem directly, so I’ve used the script from the previous post to poll the modem and pull all stats every 2 minutes via a Cron job.
Each time the stats are pulled, they are piped to a text file so that a second script that I have built can read the file and output the requested stat.
The Cron job line looks like this –
*/2 * * * * /usr/lib/zabbix/externalscripts/getmodemstats.py > /tmp/modemstats 2> /dev/null
As you can probably tell, the cronjob pipes the output of my first script to a file named modemstats in the /tmp/ directory. This lets the second script do its magic.
The Script…Part 2
The second script is a simple string find and split to get the stat that I need.
The script lives in the default directory for external scripts which is /usr/lib/zabbix/externalscripts.
To avoid having to write a script for every single stat that needs polling, I’ve written the script to use command line parameters to set the stat to poll, and the filename and location to look for the stats.
Copy and paste the following 3 lines into a .sh file, and make it executable with a chmod +x
#!/bin/bash

STAT=$1

FILE=$2

awk -v stat="$STAT" -F '=' '$1==stat { print $2 }' $FILE
I’ve named my script getStat.sh, so when I run the script, it should get me the stat as plain text output, which is what Zabbix will see.
# ./getStat.sh downstreamNoiseMargin /tmp/modemstats

61
Setting up Zabbix
In Zabbix, you’ll need to create an external check to run the script to get the stat.
I’ve created the items on my Modem, but you’re free to create the items wherever you wish. The item location does not affect anything as the the external checks are run from the Zabbix server itself.
When you create the external item, you need to ensure that the correct value is returned. This might need a custom multiplier on the item to ensure that the value returned when running the script has the correct decimal places.
For my modem, I needed to use a multiplier of 0.1 for the Attenuation and Noise Margin, while I needed to use a 1000 multiplier for the Bitrates.
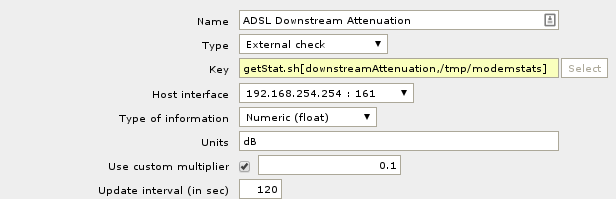
This is the configuration that I used for the Downstream Attenuation Item
Once the external item is setup, you will then start getting data as per the interval you set up.
This data can then be viewed as graphs.
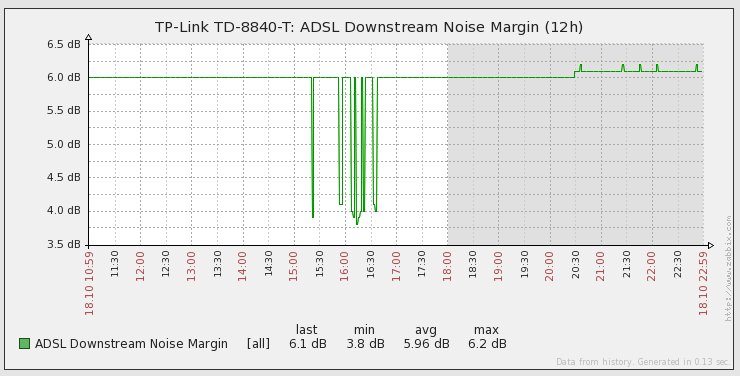
This graph is from the Latest Data screen of my Modem. It shows the Downstream Noise Margin stat.
And with that, you now have historical data of your ADSL stats!
