The OfficeOne IP Camera that I recently reviewed has the ability to periodically upload files to an FTP server.
This post will be on how to configure the camera itself to upload to an FTP server, which is pretty straight forward. All of the configuration will be done through the web interface to ensure cross platform compatibility.
I’ll also go over some of the other options of the FTP uploads.
Configuring the FTP Settings
- Navigate to your Webcam’s IP address. You can find this easily through the Search Tool if you’re using Windows. I believe OSX may have one on the application CD as well, however I don’t have a OSX device to test with.
- Login with your admin credentials…You’ve changed them, right ?!!?
- Click on FTP Service Settings
- Enter in your FTP server IP Address, and FTP Username and password.
- Click on Submit
- Click on Test to make sure that you get a
Test ... Succeedmessage
If you don’t get a Test ... Succeed then try to access the ftp server with a client like FileZilla to make sure that the FTP server is running properly. It’s also a good idea to test that the user that you’re setting up can upload to the FTP server with FileZilla.
Uploading Continously
Once the FTP settings are set up correctly, you can set up the interval that the camera will wait between sending an image to the FTP Server.
This will continuously upload pictures to the FTP server so you can see any activity that’s happened regardless of motion being detected or not.
Setting the interval for 1 second results in approximately 3 Megabytes of images each minute.
Uploading only when a motion alarm is triggered
To set the camera up to upload only when motion is detected, you’ll need to set it up in the Alarm Service Settings.
In the Alarm Service Settings, tick the Upload Image on Alarm box, and then enter in an interval that the camera will upload to the FTP Server.
You will also need to select the times that the motion detection will be activated. In this screenshot, I have selected all the times so it will always upload to the FTP server.
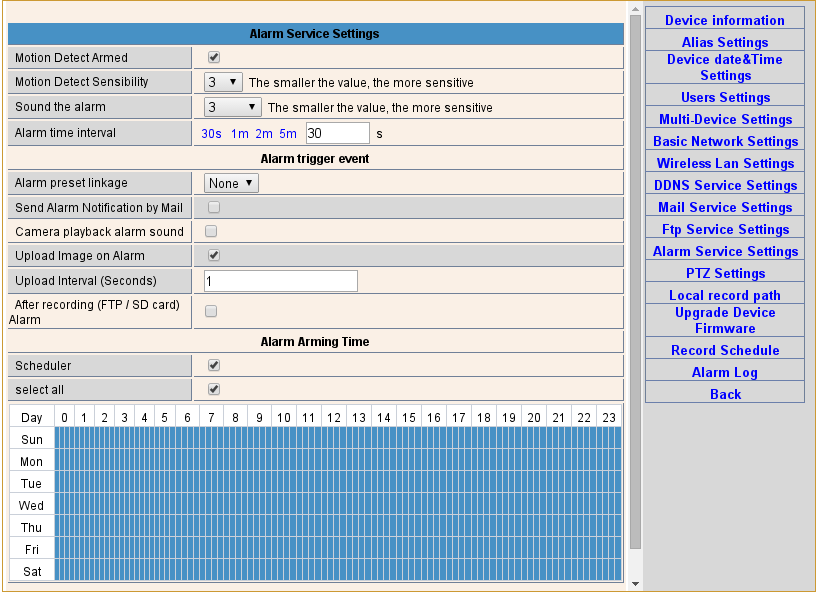
To also get Video recordings uploaded, tick the After recording (FTP / SD card) Alarm box. However the video is in a .h260 format which I have not worked out how to view outside of the cam’s built in viewers just yet.
That’s It!
That pretty much covers the options of FTP Uploading from these cameras. Just simple images and/or videos from the cam itself to the FTP server. An SD Card is not required for this function to work either so you could potentially have a NAS to record everything the IP Cam sees if required.
If there’s anything I missed, feel free to drop me a comment and I’ll try to cover it in future posts.

To view the .h260 file, rename the extension to mjpeg and view it in VLC.
Thanks for that!
I forgot to update the post when I found that out a little while back. Oops