This guest post is proudly brought to you by Eltechs, the maker of ExaGear!
RetroPie: an introduction
RetroPie is a solution that enables running old(ish) video games (arcade, PC or home console) on your PC, Odroid or Raspberry Pi. (In fact, it is the most popular graphical front-end for Raspberry Pi). Working on open source OS, such as Debian and Ubuntu, RetroPie can run as a standalone OS from a specially prepared SD card or on top of existing one, such as Raspbian.
What makes RetroPie great? An evolution of good old EmulationStation of Arch Emulators, it incorporates the best features of almost every gaming emulator in existence. Not only it has a familiar user-friendly EmulationStation interface complete with an array of custom themes and 50+ most popular systems already installed in it, but also includes RetroArch (a Libretro application API that helps to launch games) and powerful Kodi media center.
Having grown out of EmulationStation, RetroPie developed into a large open source project for devices with ARM cores and received wide acclaim. With a range of extended features, it is perfectly compatible with Raspberry Pi 0/1 and 2/3, Odroid C1/C2, Odroid XU3/XU4 (the last two working on Ubuntu) and PC devices (running Ubuntu or Debian).
RetroPie: Building All-in-All Gaming Machine
This step-by-step guide will show you how to build an extremely powerful gaming machine on Raspberry Pi and configure it to meet your particular needs. With it, you’ll be able to play nearly any home console game in history and many x86 PC games as well (using special ExaGear emulator – read more (*backlink – https://eltechs.com/RetroPie-raspberry-pi-retro-gaming-machine/)
).
Besides Raspberry Pi 2/3, you’ll need the following hardware:
| Micro SD card (min 8Gb) |  |
| Your favorite USB Controllers (almost all of them are compatible, including XBox360 and Wii) |  |
| A keyboard and a mouse (for the first-time setup) |  |
| A monitor or TV (needs HDMI and/or AV cables) |  |
| Additional PC (Windows, Linux or Mac) for initial SD card installation and ROMs transferring |  |
Please note that the Raspberry Pi 2 configuration is slightly different from that of the Raspberry Pi 3:
| Model | Raspberry Pi 2 Model B | Raspberry Pi 3 Model B |
|---|---|---|
| Frequency | 1000 MHz | 1200 MHz |
| Memory | 1 GB RAM | 1 GB RAM |
| OS | Raspbian Stretch (Nov’2017 or later) | Raspbian Stretch (Nov’2017 or later) |
| Software | ExaGear Desktop for Raspberry Pi 2 RetroPie for Raspberry Pi 2/3 |
ExaGear Desktop for Raspberry Pi 3 RetroPie for Raspberry Pi 2/3 |
RetroPie: installation process
As we already stated above, there are two ways of installing RetroPie on Raspberry Pi* computers: on top of an existing OS or, if there has been no OS installed, from a pre-made image on SD card.
*We only show how to install RetroPie on Raspberry Pi devices in this tutorial, because they are the most popular. In case you own a PC or an Odroid, please follow the instructions on RetroPie official website.
Installing RetroPie on top of an existing OS
In this example, the OS is Raspbian.
First, you need to see if your locale is right. Run the command line and type in “locale”. The output should look like this:

If what you see differs from the parameters listed above, this command will help you to set everything right:
$ sudo update-locale LANG="en_US.UTF-8"

#replace the LANG with any parameter from the list above and set the value within ""
2. Install the packages for the RetroPie setup script:
$ sudo apt-get install git lsb-release
3. Download the RetroPie setup script:
$ cd

$ git clone --depth=1 https://github.com/RetroPie/RetroPie-Setup.git
4. Launch it:
$ cd RetroPie-Setup

$ git clone --depth=1 https://github.com/RetroPie/RetroPie-Setup.git

$ chmod +x RetroPie_setup.sh

$ sudo ./RetroPie_setup.sh
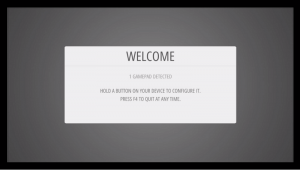
Without any further action on your part, the PetroPie will start to boot and greet you with the Welcome screen. Now it’s time to configure the controller(s) and assign buttons. The task will seem much easier if you use prompts.
Please note that the emulators will only appear after you’ve added the corresponding ROMs. What those are, we’ll tell a little bit further.
Installing RetroPie from a pre-made Image on an SD card
This is how you transfer a RetroPie image to your SD card:
1. Depending on whether you have a Raspberry Pi 0/1 or Raspberry Pi 2/3, select and download an archive containing the relevant image file.
2. Extract the image file (it comes in the .img format) with your preferred software.
3. Now, you need to write it on your SD card. For this, you’ll need a special application: Win32DiskImager for Windows PC, Apple Pi Baker for Mac or Etcher for Linux. (Click here to see how to use these). Or, you can use the command line interface.
4. Done? Splendid. All that’s left to do is to boot your RetroPie and configure your controller(s). Insert your SD card into your device and switch it on. After that, the RetroPie will boot automatically. To change the controller settings, simply press the proper button and hold it down for a couple of seconds.
A quick reminder: you won’t see any emulators on your first boot. They will appear after you’ve installed the game files to their respective folders. For example, after you’ve added ROMs for GBA and XBOX, their emulators will appear in RetroPie. (Read about ROMs below).
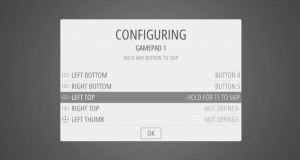
Configuring RetroPie Controllers
Now that you’ve successfully booted the RetroPie for the first time, it’s time to choose the preferred settings for your controller(s). No need to do anything to detect them: once you’ve plugged them in, the app will automatically pick them up (note that if you plug in after the boot, a restart will be necessary). After the welcome screen, switch to the menu and assign the specific functions to the buttons using prompts. To have a button assigned, press it and hold it down a second or two, do the changes and proceed to the next one. After you’ve finished, the window will close.
You can configure the controllers in any of the 3 following ways:
Automatic Configuration
Core Input Remapping
Hardcoded Configuration
Automatic configuration means that once you change the settings for EmulationStation controllers, it will affect Libretro ones as well, and vice versa.
Core Input Remapping will help you to manually assign different sets of values to different cores. Depending on the core operating at the moment, a specific layout scheme will be used. In order to do that, you’ll need to take the following steps:
Start the game with controllers you’d like to reconfigure
By pressing “Select+X”, open the RGUI
Select “Controls” in the Quick Menu
Configure controllers in any way you like
Now, choose “Save Game Remap File” to change the scheme for a particular game or “Save Core Remap File” to remap the whole emulator.
Hardcoded Configuration is the broadest way of configuration: you can change settings for a particular game, emulator or system. This is achieved by tinkering with the “retroarch.cfg” files, which are located in their respective directories. If you only need to remap the particular games, you’ll have to manually edit each file. Go to /opt/RetroPie/configs/all/retroarch.cfg to change the global settings.
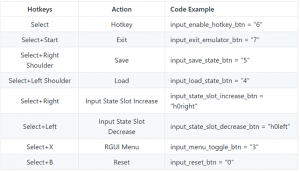
No matter which method of configuration you choose, here’s list of the default hotkeys for all controllers–may come in handy:
RetroPie ROMs
Hurray, we come to the question of ROMs, at last. ROM stands for Read Only Memory. Remember the game cartridges that you used to insert into your old home console? Well, ROM images are nothing else but digital copies of those cartridges. To run a particular game, one needs to find a specific ROM and transfer it to the SD card, then launch the game in RetroPie by virtue of a corresponding emulator.
Not so fast. Copyright Property Rights Law states that downloading ROMs from the Internet is mostly illegal (although some games are in the public domain) while only a handful of them can be purchased online. Therefore, we cannot provide them together with the RetroPie. However, you may still own the old cartridges. In that case, you may download digital copies (through P2P, for example) and manually add to your RetroPie gaming machine.
There are three ways of transferring ROMs to RetroPie: via SFTP, USB, or Samba
Transferring ROMs via SFTP:
Enable SSH by typing sudo raspi-config in the command line
A pop-up window will appear; follow the path: Interfacing Options -> SSH -> Enable -> Reboot Your Pi.
Access RetroPie folders using an application (for Raspberry Pi, WinSCP would be our choice). The default username is “pi”, and the default password is “raspberry”.
Transfer the ROMs
Transferring ROMs via USB (must be pre-formatted to NTFS or FAT32):
Create a folder named “RetroPie” on your USB device
Plug the device into your Raspberry Pi and wait for it to finish blinking
Unplug, then insert it into the PC where all your ROMs are stored
Copy the ROMs to their respective folders on the device (RetroPie/roms folder)
Plug it back into the Raspberry Pi
Restart RetroPie from the Start Menu
Transferring ROMs via Samba:
For Windows: type “\\RetroPie” into the folder
For MAC: open finder, select “Go”, then “Connect to Server”, type “smb://RetroPie” and press “Connect”
Upload the ROMs
Phew! All set, at last. Now you can play the old school games by way of modern-day conveniences. Choose the emulator and the game in the interface–and enjoy!
This guide is quite complete to let you start and first run Retropie. Much more detailed instructions including Wi-Fi setup, RetroPie updating process, detailed Emulators installation tutorial, special ExaGear emulator for PC gaming setup guide is edscribed in this Ultimate Retropie Guide by Eltechs (*backlink – https://eltechs.com/RetroPie-raspberry-pi-retro-gaming-machine/)
