I’ve wanted to get some temperature stats for some of my boxes for a while now to replace my aging Cacti install.
Since I already had Zabbix, that was the first place I looked for the functionality, however it does not have any templates set up out of the box, so I decided to set up my own templates for Temperature monitoring via SNMP.
I’m using Zabbix 2.2 at the moment, but the instructions should be applicable to 2.4 as well.
I’m using the Linux SNMP agent to get the temperature stats – the relevant packages on Debian are snmpd and lm-sensors.
First Things first
We need to install the snmp daemon if not already installed – apt-get install snmpd lm-sensors
After installing those the snmp daemon and lm-sensors, you may need to run sensors-detect to make sure the sensors are configured correctly.
Once the snmp daemon and lm-sensors is configured, running a snmpwalk for temperatures should result in something like this –
user@debian:~$ snmpwalk -v 2c -c public 127.0.0.1 1.3.6.1.4.1.2021.13.16.2

iso.3.6.1.4.1.2021.13.16.2.1.1.1 = INTEGER: 1

iso.3.6.1.4.1.2021.13.16.2.1.1.2 = INTEGER: 2

iso.3.6.1.4.1.2021.13.16.2.1.1.16 = INTEGER: 16

iso.3.6.1.4.1.2021.13.16.2.1.1.17 = INTEGER: 17

iso.3.6.1.4.1.2021.13.16.2.1.1.18 = INTEGER: 18

iso.3.6.1.4.1.2021.13.16.2.1.2.1 = STRING: "Core 0"

iso.3.6.1.4.1.2021.13.16.2.1.2.2 = STRING: "Core 1"

iso.3.6.1.4.1.2021.13.16.2.1.2.16 = STRING: "temp1"

iso.3.6.1.4.1.2021.13.16.2.1.2.17 = STRING: "temp2"

iso.3.6.1.4.1.2021.13.16.2.1.2.18 = STRING: "temp3"

iso.3.6.1.4.1.2021.13.16.2.1.3.1 = Gauge32: 39000

iso.3.6.1.4.1.2021.13.16.2.1.3.2 = Gauge32: 36000

iso.3.6.1.4.1.2021.13.16.2.1.3.16 = Gauge32: 39000

iso.3.6.1.4.1.2021.13.16.2.1.3.17 = Gauge32: 42000

iso.3.6.1.4.1.2021.13.16.2.1.3.18 = Gauge32: 4294965296
It looks like gibberish at a glance, but it’s actually telling us that it can detect 5 sensors.
The top 5 lines – the ones that have INTEGER are the identifiers for the sensors,
The next 5 lines – the ones that have STRING are the names of the sensors,
and the last 5 lines are the values of the sensors to 3 decimal places, just without the actual decimal point.
So that’s the Linux part all set up. On to Zabbix…
Zabbix Configuration
Regex
First up, we need to setup a RegEx to catch the sensors we want to monitor. In my case, I wanted to monitor all of them so I used the following regex which I named Sensors for Discovery –
^(temp[0-9]*|Core [0-9]*)$
The RegEx configuration is located in the Admin Tab, then drop down the menu on the right to get to “Regular expressions”
Template
Once that is done, we’ll need to create a new template. I’ve called mine “Template SNMP Sensors” and added it into the group “Templates”.
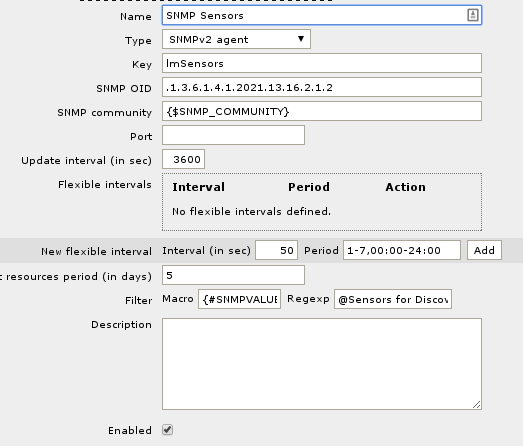
Create a new Discovery rule on the Template with the following settings

I’ve used {#SNMPVALUE} for the Macro, and @Sensors for Discovery for the Regexp.
You can use any value for the Key, that is a value internal to Zabbix.
And to save you some typing, the SNMP OID that is in the image is .1.3.6.1.4.1.2021.13.16.2.1.2
Item Prototype
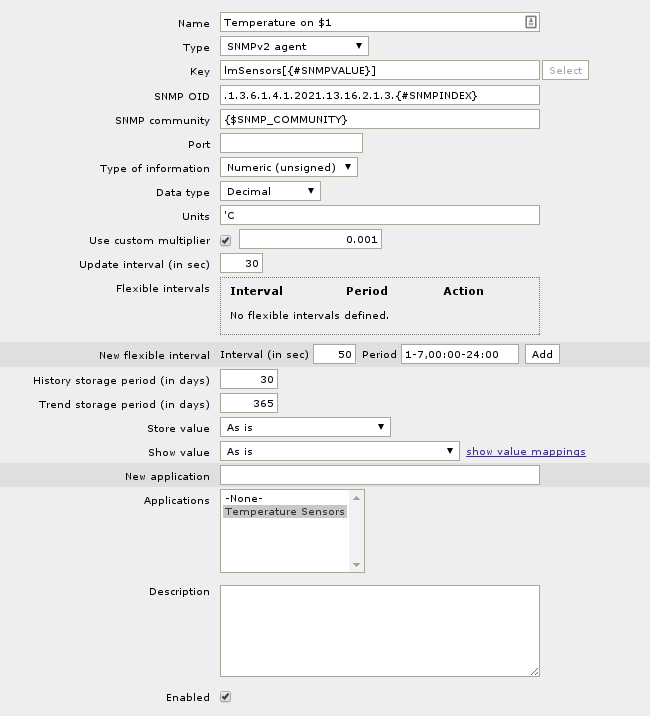
Once the Discovery Rule is setup, you will need to create an Item prototype.
Here’s one I prepared earlier

Again, the Key is internal to Zabbix, however the [{#SNMPVALUE}] is essential.
And again, here’s the SNMP OID to save some typing – .1.3.6.1.4.1.2021.13.16.2.1.3.{#SNMPINDEX}
Apply the Template
Once the Discovery and Item Prototype is setup, you’ll need to apply the template to a server in order for Zabbix to discover the sensors.
Once the sensors are discovered, they should show up in latest data with some values. The discovery itself may take a while unless you adjust the Interval on the Discovery Rule in the Template.


