I was introduced to ExaGear a couple of weeks ago by the team behind ExaGear.
It immediately piqued my interest as it opens up many new ways to use a Raspberry Pi as it allows X86 applications to be run on a Pi.
They’ve kindly donated a copy of the software so I could check it out!
Downloading it on my rather slow internet connection took a bit over an hour.
While I was waiting, I went looking for some documentation.
While there’s no clear documentation on the website besides a basic overview of ExaGear, and also some key points and pricing, the forums had quite a few active topics, showing that there was a community using ExaGear.
The install package has the ReadMe and some documentation however, and reading through that gave me the following prerequisites:
CPU:
○ ARMv6 architecture for Raspberry Pi 1 and Raspberry Pi Zero
○ ARMv7 or ARMv8 architecture for other ARM devices
○ support of VFPv3D32
○ for x86 applications that use MMX/SSE support of NEON is also required
● RAM: 512MB or more
● Disk Space: 1GB
● OS: ARM Linux Ubuntu 14,15,16, Debian 7,8, Raspbian Wheezy and Jessie.
Additionally binfmt_misc kernel module is required.
I’ve installed Raspbian Lite on my Raspberry Pi 3 so that I could try out ExaGear.
Installing ExaGear was very simple, just running the script installs all the prerequisite packages as well as a guest x86 image that allows me to run x86 applications straight away.
As you can see from the screenshot below, running exagear has switched over to the i686 kernel which allows me to run x86 apps.

The CPU now shows up as a quad core virtual CPU when I check /proc/cpuinfo
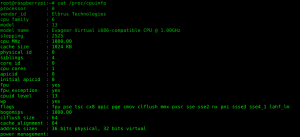
The output of /proc/cpuinfo. The screenshot only shows the first core.
Running an apt-get update now allows me to search for x86 software to run, including WINE! But the first thing I’m going to do is run some benchmarks to see what the difference in performance between running a benchmark natively, and running it in the ExaGear VM.
At first, when I was running the benchmarks, I seemed to get similar scores, but I soon realised that heat was becoming an issue. The Pi that I was using is in a Kano case and as such, has very little ventilation, so the benchmarks may have to wait for another post after I’ve taken the case off!
My initial impression of ExaGear is that it’s very easy to install and use. I’ve been running it on the commandline so far and it doesn’t even register that it’s running in a VM. I’ll have to play around some more to see how it goes, so stay tuned for more!

So what does this do that WINE doesn’t?
Wine doesn’t run on ARM CPUs at all whereas ExaGear lets you run Wine on ARM CPUs
Ahhhhh, thank you.