Feb 112013
 

A few months ago, the SD card socket on my original Raspberry Pi broke off to do an unfortunate smelting accident…No, not really. It was just dropped onto the SD card socket and snapped.

After some months of trying a few different fixes, I eventually gave up and bought a 512mb Raspberry Pi instead. But recently with some new ideas, I wanted another Pi to test out a few different things at once. Since I had a Pi lying around already, I decided to have another crack at fixing it.
I found a SD card socket that was almost a perfect fit for the Pi from Element 14 (SKU 2081361)

The old SD Card had already been de-soldered from my earlier attempts, so I just had to line up the pins and solder them down.

The end result came out like this –
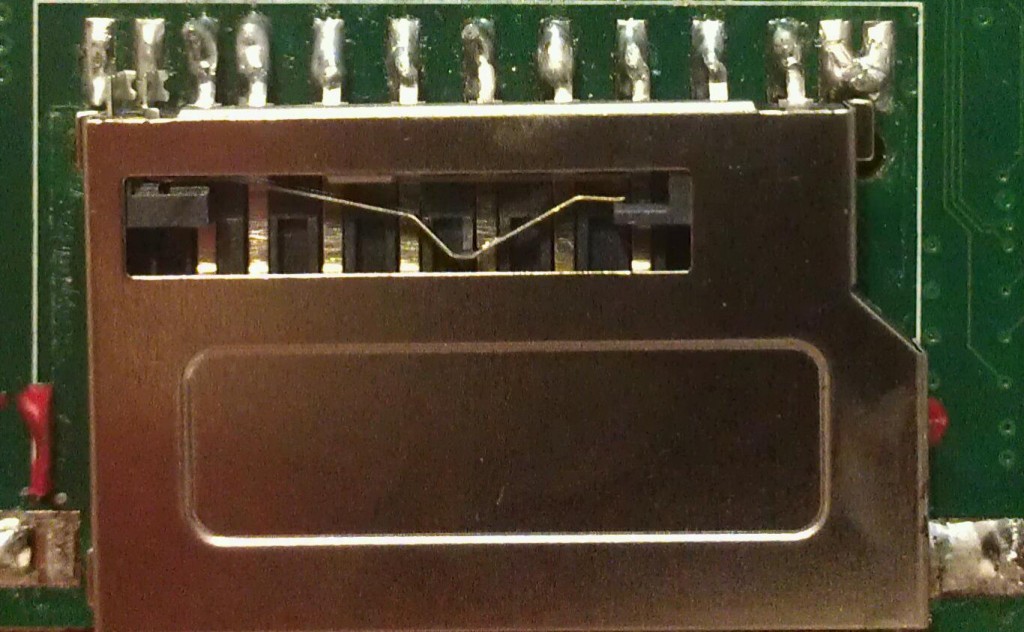
SD Card Socket

There are 2 floating pins (on the left in the picture) that are used to detect whether the card is inserted, which are at the opposite end of where they should be, so I ended up just leaving them be, and on the Pi itself soldered the 2 pins that should have been connected there. This means that the Pi will always think that there’s a SD card inserted. Apart from those 2 pins, each and every other single pin lined up perfectly.

My soldering isn’t great so the SD card socket is a bit crooked, but the SD card still fits in beautifully in the case that I also purchased off Element 14.

After soldering, I inserted an SD card, and successfully booted up the Pi with the new SD card 😀

Share
Oct 092012
 

Hi Everyone,

Apologies to all as I have not had the time to write any new informative blog posts. I haven’t made any more progress on my Raspberry Pi either unfortunately as I have broken the SD card socket on my Pi. I am part of the way through fixing it up now though so hopefully I’ll be able to get it back up and running.

I have desoldered the old SD card socket, and have soldered on wires to all the pads except the 2 outer ones on each side. I got one of these SD Card readers ready to attach the wires onto. I don’t have pictures at the moment but I’ll get them up as soon as possible.
Hopefully this well let me get my projects up and running again so I can keep the Raspberry Pi goodies coming.

I’ll also do a better write up of the SD Card socket repair if it works.

Share
May 202011
 

Hi all,

It took me a while and multiple reinstalls to work out how to do this properly, so I’m sharing what little knowledge I have with you all.
On my eeePC 701 I have a 4 gb SD card that I am now using for my /home directory.

I have formatted the SD card as ext2, and then setup fstab to mount /dev/sdb1 as /home.
The only downside is that I can’t have any other usb storage devices plugged in when I boot, or udev will assign /dev/sdb to the other device and stuff up the boot sequence.
I’ve tried to setup udev to always assign /dev/sdb to my SD Card reader in my eeePC but I can’t seem to get that to go.
But I don’t normally have any other USB media plugged in when I boot my eeePC so I have left it for now until it really bugs me.

First thing you will want to do, is put a delay into the boot sequence so that the eeePC has time to detect the SD card / reader. I found that out the hard way.
I’ve installed Crunchbang on my eeePC so my configuration file may be a little bit different to stock, but it should be somewhat similar still.
So, on my eeePC, I’ve edited the file /etc/grub.d/10_linux and added ‘rootdelay=5’ to my boot parameters.
This pauses the boot sequence for 5 seconds, in which time the eeePC detects the SD card / reader.
In my version of the file, it’s on line 83 but yours may differ, the codeblock shows what my file reads.


linux ${rel_dirname}/${basename} rootdelay=5 root=${linux_root_device_thisversion} ro ${args}

After that’s been done, you will need to format the SD card to ext2 so that the permissions will work on the SD card. I tried formatting to FAT32 but it had issues so I left it on ext2.
After the SD card is formatted, you will then need to modify fstab. Below is the line I have for the sdcard.


/dev/sdb1 /home ext2 defaults,noatime 0 0

Once again, I had tried to use the UUID for the SD Card reader but it didn’t like it and refused to boot, so I relented and just used the standard /dev/sdb1 notation, however as mentioned before, it can cause issues when other USB media is plugged into the eeePC
Once fstab has been modified, you will need to make sure the SD card has a directory for your user. Otherwise it will boot but then will find a fat lot of nothing to use for your user settings etc.
So once you’ve moved over all your stuff onto the SD card under your username’s directory, you should be all set.
You can now reboot, and when you reboot and login, it should now be running off your SD card.

You will take a minor speed hit as the SD card is not as fast as your internal flash drive, but it’s replaceable and also easy to backup if you need to.
Just take the SD card out, and copy everything off of it and the backup is done ! 🙂

Share