One of the reason why I bought the IP camera in the first place was to replace a USB webcam that I was using to do some motion detection. The camera was plugged into a virtual machine and wasn’t very reliable so when I saw the IP Camera, it crossed my mind that it would be a nice cheap replacement for the webcam.
The first thing I needed to to do was configure the username and password on the IP Camera itself. This is to ensure that no one can log in to the webcam from the cloud service.
Configuring the IP Camera
I will be doing any setup for the IP Camera on the web interface as it’s a platform agnostic way of setting it up.
Log in to the camera by directing your browser to http://
The default credentials are “Admin” with a blank password.
Click on sign in on one of the modes, I’ve used the Chrome mode.

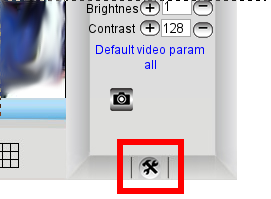
Click on the settings button in the bottom right hand corner, and then click on Users Settings in the right hand menu.
If you want to, you can change the name of the admin user here, I’ve set a password for my admin user here.
Click on Submit. The IP Camera will now reboot for the settings to take effect.
Configuring Motion
I’ll be using Motion for more than one device so I will configure it using separate configuration files for the camera in preparation for other cameras to also be added in. It’s possible to use a single configuration file if you want, but if there is a possibility of adding more cameras later on, it would be easier to start with multiple configuration files off the bat.
Configuring the Motion Daemon
There’s a few settings that I’ll be changing from the default Motion configuration.
First thing you should change is the line in /etc/default/motion. Change it to read from no to yes.
Next, we’ll have a look at motion.conf.
The following lines in there that I will be commenting out so that Motion doesn’t look for a local device. It’s possible that you don’t need to comment these line;s out, but I prefer to be thorough to ensure nothing unexpected happens.
videodevice /dev/video0
v4l2_palette 17
input -1
norm 0
There’s also a few lines you’ll need to update.
There are a couple of lines that set the resolution. By default, they are at 320 and 240.
width 320

height 240
Update these 2 lines to 640 and 480 like so
width 640

height 480
I’m also going to up the framerate from framerate 2 to framerate 30 to get some smoother video, Keep in mind that this is just a maximum framerate.
We’ll update the server options next so that you can access the control panel from another computer on the network.
There is a couple of lines like this –
stream_localhost on

webcontrol_localhost on
These needs to be changed to off like so –
stream_localhost off

webcontrol_localhost off
At the bottom of the configuration file, you will see some thread lines. We’ll need to uncomment one so we can put the settings for our first camera into one of the files.
From
; thread /etc/motion/thread1.conf
To
thread /etc/motion/thread1.conf
thread1.conf
If you’re only intending to use one camera then you don’t need to create this file, you’ll just need to do the following in the main motion.conf file.
In this file, we’ll need to set the URL for the camera itself.
Put this into a new file named /etc/motion/thread1.conf
netcam_url http://192.168.2.16:99/videostream.cgi?user="YOUR ADMIN USER HERE"&pwd="YOUR ADMIN PASSWORD HERE"
Replace the username and password with your own.
Save the file, and then you should be able to start motion with /etc/init.d/motion start
Then, using a player like VLC and browsing to the address of the computer running motion on port 8081 should get you a stream of the IP Camera.
